
A few weeks ago I let you know that a NES emulator was ported to the BlackBerry PlayBook. GitHub user a7omic recently ported the Snes9x emulator to the PlayBook so we can now also enjoy SNES games on the go! The port, known as “Snes9x-pb” was submitted to BlackBerry App World but for now you’ll have to side-load it using the DDPB Installer. Ronen over at BerryReview shared a great and quick guide on how to install Snes9x and SNES roms on the PlayBook:
- Connect the PlayBook to the PC via USB
- Start development mode on the PlayBook
- Frantically find SNES roms for my fave games of all time (found them all here, but google can tell you more I’m sure)
- Download the .bar file
- Open the DDPB installer
- Click scan and enter your password
- Add the .bar file (snes9x-pb-1_0_0_5.bar)
- Click install and wait for it to complete
- Find the icon on your PlayBook, open it and allow file access
- Add all your favorite roms (.smc files) to the roms folder on your PlayBook
- Enjoy hours of SNES awesomeness wherever you tote your PlayBook!!!
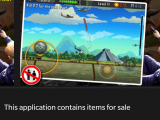
I can confirm that Snes9x works great on the PlayBook, sound and all, but the D-pad is a little awkward since it’s just a circle. For more info and to download the ported emulator visit its page on GitHub or check out some detailed instructions and screenshots below.
All we need now are Game Boy and PS1 ports! 😀
Snes9x for Playbook General Execution Information
First Run
When you run Snes9x for Playbook for the first time it will automatically creates a number of default directories as well as the default configuration file and the default test rom file. These default test rom will be run during this first execution of the program.
Directory Creation
When you run Snes9x for Playook it will automatically create the following directory on your playbook if they do not exist:
/accounts/1000/shared/misc/snes9x-pb/
This will also contain a number of subdirectories including the rom directory.
Default Files
Snes9x for Playook will place the default snes9x.conf file into the folder /accounts/1000/shared/misc/snes9x-pb/ if it does not exist. Snes9x for Playook will place the default test rom into the folder /accounts/1000/shared/misc/snes9x-pb/rom/ if it does not exist.
If you delete these files at any time they WILL be recreate the next time you run Snes9x for Playbook.
Adding Roms
Simply place your roms into the folder /accounts/1000/shared/misc/snes9x-pb/rom/
Filename - snes9x.conf
The default snes9x.conf file will have the file name commented out. If you uncomment (remove #) and add a file name that rom will be the first rom that is run when Snes9x for Playbook is executed.
The file name does not require the .smc file extension but it is recommended if you want that rom to be picked up by the Automatic Rom Selector/Cycler.
If the file has the .smc extension then it must have it in the snes9x.conf file, if there is no extension on the file then it cannot have the extension in the .conf.
Examples:
File in rom directory is ttt.smc Filename = ttt.smc
File in rom directory is ttt Filename = ttt
File in rom directory is TTT.SMC Filename = TTT.SMC
Automatic Rom selector/Cycler
If you do not add a Filename to the snes9x.conf file Snes9x for Playbook will automatically run the roms that are in your rom folder, sorted alphabetically it will load the first one.
Whether or not you have added a Filename in the snes9x.conf you can use the next button on screen to load the next rom in the rom folder. Snes9x for Playbook will continually cycle through all of the roms in your rom folder.
Note: In order for the Rom selector to read your rom it must have the .smc file extension
snes9x.conf
You may edit the configuration in the snes9x.conf file all you want but your results may vary and are not supported by us in any way.
Some configuration fields may not be supported at this time.
Related posts

Reaper is a Free [Hack ‘n Slash] Action RPG for the Blackberry Z10 and Z30
by - Sep 26, 2013 3:35 PM
A Heap of Games Have Quietly Gone on Sale in Blackberry World
by - Sep 25, 2013 5:26 AM

Spruce Up Your Text With Whacky Fonts in BBM, Facebook, or Twitter Thanks to Fontify
by - Sep 23, 2013 12:48 PM

Magic4Square Offers Automated Check-in Support for Foursquare
by - Sep 20, 2013 8:23 PM
Evernote for Blackberry 10 Now Officially Available in Blackberry World
by - Sep 17, 2013 8:53 PM

BBM for Android APK Floating Around in the Wild with Limited Functionality, Imminent Launch
by - Sep 16, 2013 7:06 PM

The Icy Tower Series Offers Loads of Jumping Goodness on Blackberry 10
by - Sep 12, 2013 10:59 AM